The scratch happened on a Tuesday. I was showing my nephew how VR worked. He got excited, waved his hands around, and somehow dragged the corner of his watch across the right lens. Left a nice deep gouge right in the center of my view.
I looked up replacement options. Google stopped selling Cardboard years ago. No official parts anywhere. My choices seemed to be: buy a whole new headset or live with the scratch.
Then I started digging. Turns out, there's a whole world of replacement lenses for Google Cardboard DIY fixes that most people don't know about. I went down that rabbit hole so you don't have to.
Why Google Cardboard Lenses Fail in the First Place?
Before I tell you how I fixed mine, let me explain why you're probably reading this. Google Cardboard lenses are made of acrylic or basic plastic. Not glass. Not high-end polycarbonate.
Cheap optical plastic that scratches if you look at it wrong. I've seen three common ways these lenses get damaged:
Dust and dirt. You put the headset down on a table. Tiny particles stick to the lenses. Next time you wipe them with your shirt, you're basically sanding the surface. Micro-scratches everywhere.
Accidental contact. Someone wears glasses inside the headset. The frames rub against the lenses. Instant damage. Happened to a friend of mine within five minutes of letting his brother try his headset.
Storage mistakes. Leaving the headset in a drawer with other stuff. Keys, cables, random junk pressing against the lenses while you're not even using it.
The cheap plastic focal points in most Cardboard headsets have a life expectancy of approximately 12-18 months with normal utilize. After that, the gathered micro-scratches make everything see foggy. So if you're holding a scratched headset right presently, you're not alone.
The Amazon Lens Replacement Gamble
I did what most people do. Opened Amazon and searched replacement lenses for google cardboard diy amazon. A bunch of options popped up. Prices ranged from $8 to $25. None of them said "official Google Cardboard replacement." Because there's no such thing.
I ordered a set from a seller with decent reviews. Biconvex lenses, 45mm diameter, 5x magnification. Looked right in the photos. When they arrived, I popped my headset open and swapped them in.
The lenses were slightly thicker than my originals. They fit, barely, but the focal length was off. Everything looked slightly warped. After five minutes, I had a headache.
Here's what I learned the hard way: replacement lenses for Google Cardboard DIY isn't just about finding lenses that physically fit. It's about matching the exact specifications your specific headset was designed for.
The Amazon seller didn't include a QR code for calibration. The listing didn't specify the focal length. I was basically guessing.
What I Learned About Lens Specs That Nobody Tells You?
After that fizzled endeavor, I begun investigating what really makes a Google Cardboard lens work. Most Cardboard headsets utilize biconvex focal points with a central length between 40mm and 50mm. The most common estimate is 45mm distance across with a 5x amplification (generally 45mm central length)
But here's the catch. Different Cardboard models use slightly different specs. The original Google Cardboard v1 used 45mm lenses. The v2 used 38mm. The cheap knockoffs you find on Amazon? Could be anything. If you're looking for replacement lenses for Google Cardboard DIY, you need three things:
-
The exact diameter of your original lenses (measure them with a ruler)
-
The focal length (harder to measure, but you can look up your headset model online)
-
The lens type (biconvex is standard for Cardboard)
The Fix That Actually Worked for Me
After the Amazon failure, I found a better path. I ordered biconvex lenses from a specialty optics supplier instead of a random Amazon seller. Cost me $12 for a pair including shipping.
Same price as the gamble, but I knew exactly what I was getting.
Specs I used:
-
45mm diameter (matched my original lenses)
-
45mm focal length (standard for most Cardboard headsets)
-
Biconvex design (curved on both sides)
Here's the step-by-step of what I did.
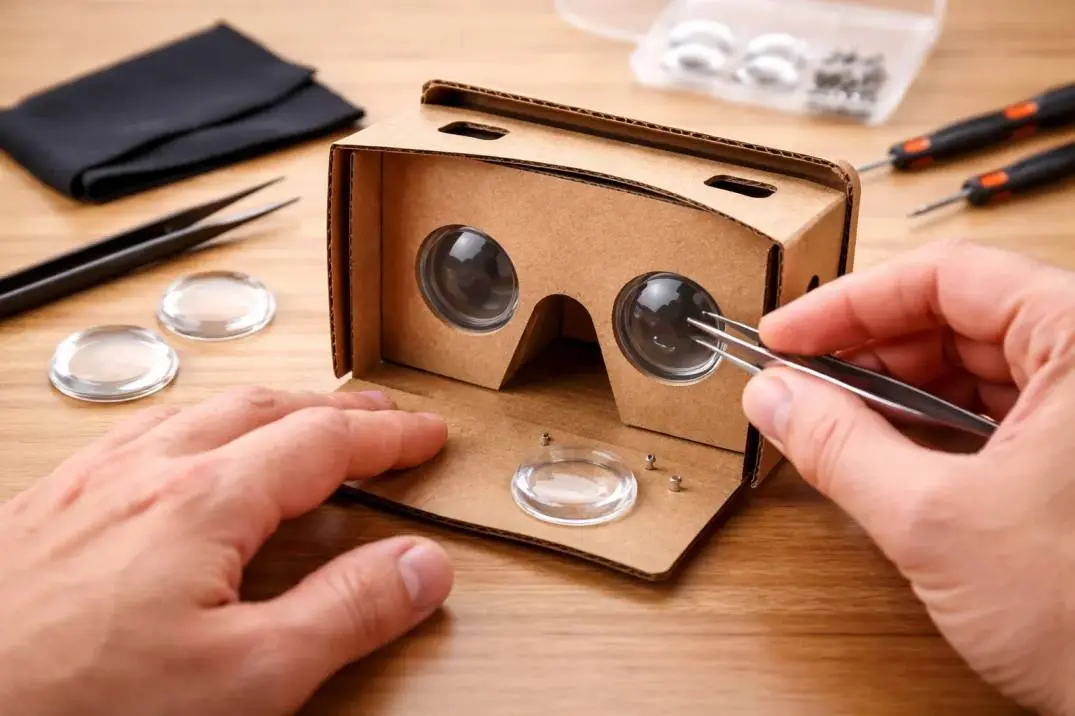
Step 1: Remove the old lenses.
My headset had a basic plastic maintenance ring holding each focal point in put. Focal points split effortlessly if you're not careful.
Step 2: Clean the housing
Dust and flotsam and jetsam had built up around the edges. I utilized a can of compressed discuss to blow everything out some time recently embeddings the unused focal points.
Step 3: Insert the new lenses.
Orientation matters. The more curved side faces your eyes. The less curved side faces the phone. I checked this against my original lenses before installing.
Step 4: Secure them in place.
The retention rings snapped back in. Everything fit snugly.
Step 5: Generate a new QR code.
This is the step most people skip. Your headset needs a calibration code so your phone knows how to display images correctly for the new lenses.
Read Also: How Much Does a VR Headset Cost With Controller?
I used an online QR code generator specifically for Google Cardboard. Entered my lens specs and got a code. Displayed it on my phone, pointed the headset camera at it, and let the app recalibrate.
The difference was night and day.
The QR Code Trap (And How to Avoid It)
I want to talk about this separately because it cost me two hours of frustration.
Every Google Cardboard headset uses a Google Cardboard QR code list to tell your phone the lens specifications. The QR code contains data about:
-
Lens diameter
-
Focal length
-
Distance between lenses
-
Screen size
When you buy a new headset, a QR code is usually printed on the cardboard itself or included in the instructions.
When you replace your lenses, that old QR code is wrong. Your phone is still using the calibration for the original lenses. Even if you install perfect replacements, the image will look distorted until you update the code.
I found a site called Cardboard QR Code Generator (easy to find if you search for it). I entered:
-
45mm lens diameter
-
45mm focal length
-
64mm inter-lens distance (measured with a ruler)
-
Phone screen size (my Pixel 6)
It generated a QR code on screen. I scanned it with the Google Cardboard app. Everything snapped into focus immediately.
If you skip this step, your new lenses will never look right. That's why so many people try DIY replacements and think they failed.
What If You Can't Find Replacement Lenses?
Let's say you measure your lenses and can't find matching replacements. Or your headset uses an odd size that nobody stocks. There's another option. It's not perfect, but it works.
Harvest lenses from a donor headset.
Cheap Cardboard headsets cost $5-10 on Amazon. Some use the same 45mm biconvex lenses as the standard models. You're basically buying a donor unit for the lenses.
I did this for a friend's headset that had 38mm lenses. Couldn't find replacements anywhere. Bought a $7 headset with the same lens size, pulled the lenses out, and installed them in his nicer headset.
Took ten minutes. Cost less than buying lenses separately from most sellers.
The downside? You still need to generate a new QR code based on the lens specs. And you're stuck with whatever optical quality the donor headset had. Some cheap headsets use terrible lenses with visible distortion around the edges.
The "No Lenses" Approach That Actually Works
I've seen people ask about how to make a VR headset without lenses when they can't find replacements.
Short answer: you can't get proper VR without lenses. The lenses are what create the stereoscopic 3D effect. Without them, you're just holding a phone up to your face. But there's a middle ground.
Some newer phone-based VR viewers use fresnel lenses instead of traditional biconvex lenses. Fresnel lenses are thinner and lighter. If your headset uses them, replacements are harder to find but not impossible.
If you're absolutely stuck and can't find any lenses that fit, your best option is to buy a complete headset and swap the entire lens assembly into your existing viewer.
I've done this with two different Cardboard models. The plastic housing that holds the lenses is usually a separate piece that you can transfer.
Buy Spare Lenses Before You Need Them
If I could go back in time, I'd buy a spare set of lenses the day I bought my headset. The replacement lenses for Google Cardboard DIY market is full of sellers who don't know what they're selling.
Once your lenses are scratched, you're in a rush. You buy the first thing that looks right. You probably get it wrong. Buying in advance means you can:
-
Match the specs exactly to your headset
-
Test the fit without pressure
-
Keep a spare set in a drawer for when the inevitable scratch happens
Cost is the same whether you buy them now or later. But the frustration level is completely different.
What I'd Do Differently If I Had to Do It Again
Looking back at my lens replacement journey, here's what I'd change.
I'd measure everything before ordering. Diameter, thickness, distance between lenses. I assumed all Cardboard lenses were the same. They're not.
You Must Also Like: Minecraft Google Cardboard APK: A Complete Setup Guide
I'd order from a specialty supplier, not Amazon. The Amazon sellers are reselling whatever stock they found. The specialty optics shops actually know what focal length means and can answer questions.
I'd generate the new QR code before installing the lenses. Having the code ready means you can test the focus immediately instead of wondering if the lenses are wrong or the calibration is wrong.
I'd buy two pairs. Lenses break. Lenses scratch. Having a backup means you're not doing this process twice when the inevitable happens.
Who Should Actually Attempt This?
Based on what I've learned, here's my honest breakdown.
This DIY fix is worth it if:
-
Your headset is otherwise in good condition
-
You can measure your existing lenses accurately
-
You're comfortable with basic disassembly
-
You have access to a QR code generator
Don't bother if:
-
Your headset cost less than $15 new
-
The plastic housing is cracked or damaged
-
You can't find lenses that match your specs within 1mm
-
You wear glasses inside the headset (the risk of scratching again is too high)
Sometimes buying a new headset is the smarter move. The $20 you spend on lenses and tools might be more than a decent replacement costs.
What I Use Now?
After all this, I ended up with a working headset and a valuable lesson. I still use my original Google Cardboard. The new lenses I installed have been going strong for six months. No scratches. No fog. The image is clearer than it ever was with the originals.
I also bought a spare set of lenses. They're sitting in my desk drawer with the specs written on the bag. When these lenses eventually scratch, I'm not going through the research process again.
The Final Thoughts
Scratched Google Cardboard lenses don't mean you need a new headset. But they do mean you need to do your homework before buying replacements.
Measure your lenses. Match the specs. Get a new QR code. Do those three things and you'll have a working headset for another year or two. Skip any of them and you'll end up with headaches and wasted money.
I learned this the hard way so you don't have to.